If you’re looking for a simple way to eat healthier while cutting down on meal prep time, it’s time to rethink your fridge organization! One of my favorite kitchen swaps I’ve done lately is turning my traditional sandwich meat and cheese drawer into a fully stocked salad bar—and trust me, once you make this change, you’ll wonder why you didn’t do it sooner.
This post may contain affiliate links. Please read our Disclosure Policy.
Why a Salad Bar Drawer?
We all know that eating more veggies is a great way to stay healthy, but I always feel that prepping a salad for lunch or supper feels like a chore. If I have to dig through the fridge for every ingredient, I’m guilty of giving up and opting for something quicker.
By dedicating a fridge drawer to prepped salad ingredients, I’m:
✔️ Making healthy eating more convenient
✔️ Reducing food waste by keeping veggies visible and accessible
✔️ Encouraging the whole family to eat more fresh foods (all my girls LOVE this!)
✔️ Speeding up meal prep for lunches and dinners (this is so very handy for those rushed mornings)
How to Set Up Your Fridge Salad Bar
Step 1: Clear Out & Clean the Drawer
First, remove any deli meats, cheeses, and other sandwich ingredients from the drawer you choose. If you still use these items, relocate them to a different section of your fridge or organize them in a small bin. I transferred them to the larger drawer that we usually keep veggies in.
Give the drawer a thorough wipe-down to ensure it’s fresh and ready for crisp veggies.
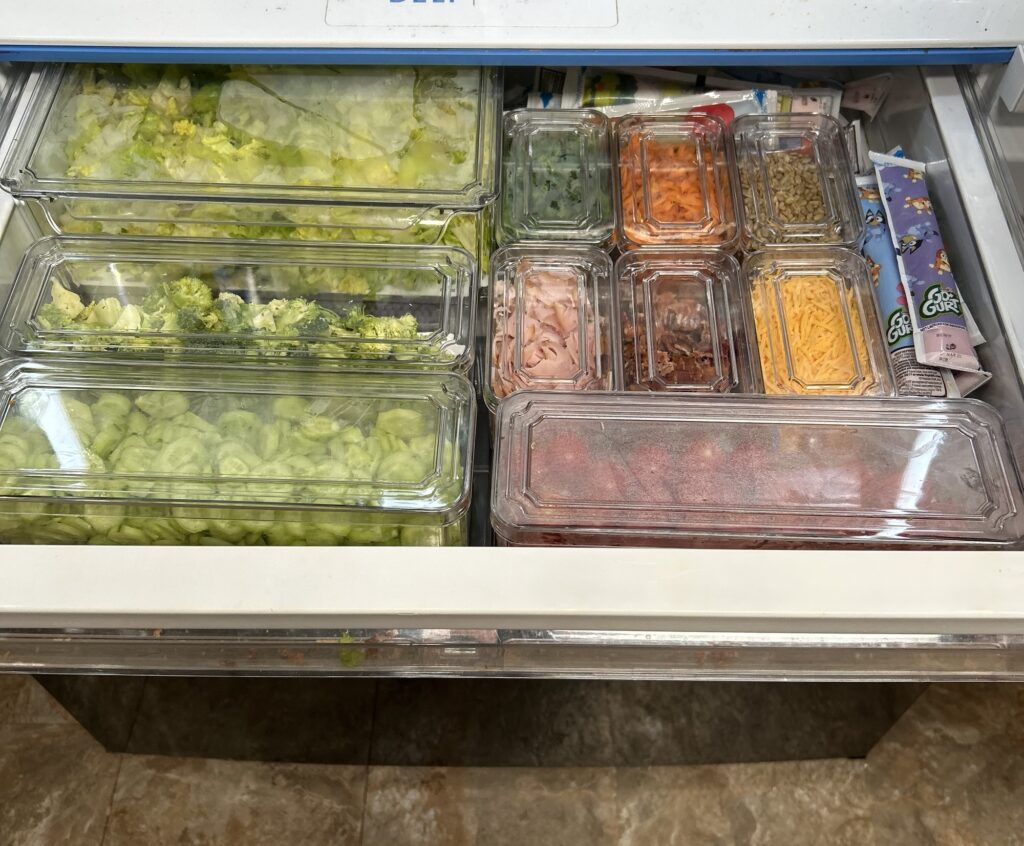
Step 2: Choose Your Salad Essentials
Think about what you and your family love to eat in salads and prep ingredients accordingly. Some great options include:
Greens – Romaine, spinach, mixed greens, or chopped kale. Keep in a sealed container with a damp paper towel to extend freshness.
Chopped Veggies – Bell peppers, cucumbers, cherry tomatoes, shredded carrots, or red onions. Store in easy access containers.
Healthy Fats – Avocado (store whole, then slice as needed), olives, or nuts and seeds in small containers.
Cheese Options – Feta, shredded cheddar, or mozzarella stored in small containers.
Proteins – Prepped grilled chicken, hard-boiled eggs, beans, or cooked quinoa for heartier salads.
Dressings & Toppings – Keep a jar of your favorite homemade or store-bought dressing nearby, along with extras like croutons, sunflower seeds, or dried fruit.
Step 3: Store Everything for Freshness
Proper storage keeps ingredients crisp and prevents spoilage. Here are a few tips:
✅ Use clear containers so you can see everything at a glance.
✅ Keep paper towels in containers with leafy greens to absorb moisture.
✅ Store dressing separately to prevent soggy salads.
Step 4: Enjoy the Convenience!
Now, anytime you or your family wants a salad, everything is prepped, organized, and ready to go. Whether you’re making a quick lunch, a side for dinner, or even a build-your-own-salad night, this system makes it so much easier to enjoy fresh, nutritious meals without the hassle.
Bonus: Use It Beyond Salads!
This setup isn’t just for salads—it works great for quick wraps, grain bowls, omelet fillings, or snacking. Having fresh, chopped veggies ready to go means healthier meals with less effort every day.
Are you ready to make the swap? Let me know if you try this out—I’d love to hear how it works for you!
Don’t forget to try my hack for soft break and bake cookies! It’s all about balance!